Here’s a test

Test text

Posted in General | Leave a comment

Create a Digital Noticeboard using a Raspberry Pi

Introduction

Digital signs and notice boards are used in many places, such as shops, community centres, and leisure centres, but you don’t need to spend a fortune to create your own. It is relatively cheap and easy to create a basic digital sign; all you need are:-

  • A TV.
  • A Raspberry PI micro computer and power supply.
  • An SD memory card.
  • A USB keyboard, this is only needed for the initial set up of the Raspberry Pi.
  • Software.
  • A computer network in the venue that will be displaying the digital sign.
  • A PC or laptop that is capable of accessing the same computer network.

The TV needs to have a HDMI socket, however nearly all modern flat screen TVs have this feature.

The Raspberry PI computer (called RPi for short) is a modern British success story, designed in Cambridge and manufactured in South Wales, it has recently become the best selling British computer with over 5 million sold.

https://en.wikipedia.org/wiki/Raspberry_Pi

There have been four versions produced since the RPi first went on sale in 2012: The original RPi with 256Mb RAM, the RPi+ with 512Mb RAM, the Rpi2 with 1Gb RAM, and the Rpi3 with a faster CPU. Each version of the RPi has also been produced in two variants: the ‘A’ with no network port, and the ‘B’ that has a network port. This digital signage project needs the ‘B’ variant of any of the four versions mentioned above, because you need a network connection in order to configure the software. The latest version of the Raspberry Pi can be purchased brand new for about £30, but the older versions can be purchased for less from Ebay or similar sources.

The SD memory card takes the role of the hard drive on the Raspberry Pi. You will need an 8Gb capacity, and it needs to be a Class 10 (this means that it has a fast data transfer rate).

There are several pieces of software that can be used to power a digital sign. For this project I have chosen the Open Source version of the Screenly software. It is free to download from this website:

https://www.screenlyapp.com/ose/

It is very popular and widely used, with a large user group on the Raspberry Pi user forums. The Open Source version has fewer features than the paid-for version, but it is more than adequate for this basic project.

Finally, the venue for the digital sign needs to have a computer network. The Screenly software is designed to be controlled via a web browser that is running on another computer on the network. Ethernet cable is the preferred method for connecting the RPi to the network. It is possible to use wifi, but it is more tricky to set up and not as reliable.

Setting Up

(Note: The following instructions will assume that readers are using Linux on their PC or laptop).

Firstly download the Screenly software and copy it to the SD card using a PC or laptop. The Screenly web site (link above) contains full instructions on how to do this. If you intend to use wifi to connect the RPi to the network then follow the next set of instructions, otherwise skip over them.

Wifi set up

The Screenly software does not have wifi support built in as it assumes that you will use an ethernet cable to configure the software. You therefore need to edit a file to set up the wifi connection.

With the SD card still connected to the card reader in PC or laptop, open a terminal and type the following two command:-

cd /path/to/your/sd/card/

sudo gedit etc/wpa_supplicant/wpa_supplicant.conf

(Note: One way to find the path to your SD card is to open the Nautilus file browser, right click on the SD card, and select Properties.)

Add the following lines to the bottom of the file, save and close:-

network={

ssid=”your-network-ssid-name”

psk=”your-network-password”

}

Replace the text in quotes with your network’s actual broadcast name and WPA password.

Note: The first boot of your RPi with this modified SD card may report an error and request that you run the ‘fsck’ command. Simply follow the instructions on the screen, then reboot the RPi.
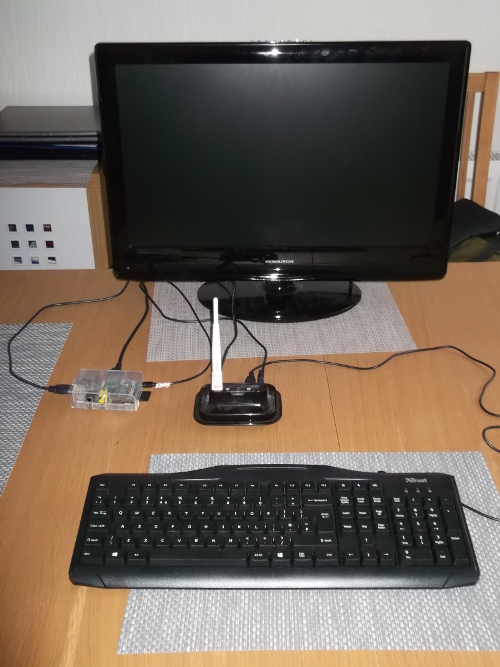
Cabling

Screenly cabling#2

Put the SD card into the Raspberry Pi. Connect the RPi to the TV using an HDMI cable, and connect it to the network using an ethernet cable (or a wifi dongle). Connect the USB keyboard to the RPi. Switch on the TV, and finally connect power to the RPi. Always power-on the RPi last to avoid damaging the device.

First Boot

Remember to be patient: the RPi is a low powered computer so its responses to commands may involve a significant delay.

The screen will initially display a large amount of text as the linux software starts its various processes. The Screenly software will start automatically and, after quite a long pause where it will show a plain black screen, it will display the introductory screen.

screenly-ip

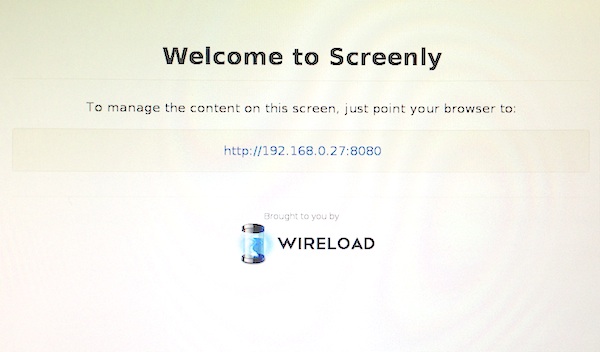
Note down the IP address shown on screen, in this case http://192.168.0.27:8080, as you will need it later. After another pause of about two minutes the default display will automatically start, consisting of two web pages with information about the Screenly software, and the sample video called Big Buck Bunny.

Managing Screenly

You manage the Screenly software using a web browser on another PC or laptop that is also connected to the same network. Simply type the IP address, that you wrote down previously, into the web address bar of your browser and press Enter. Your browser should now display the management screen for Screenly, which looks something like this:-

Screenly_schedule

The top section, Active Assets, shows the list of files, videos and websites that are currently set to display on the screen. The lower section, Inactive Assets, shows the list of files, videos and websites that are loaded onto the RPi but are not set to display on the screen. Each asset shows details of the time and date when it will start to display, the time and date when it will stop displaying, a button to allow editing of these settings, a button to delete the asset, and a switch to activate or deactivate the asset. Activating an asset in the lower section will automatically move it into the upper section, and visa-versa. Note that there will be a significant delay before newly activated assets are displayed on the screen; please be patient.

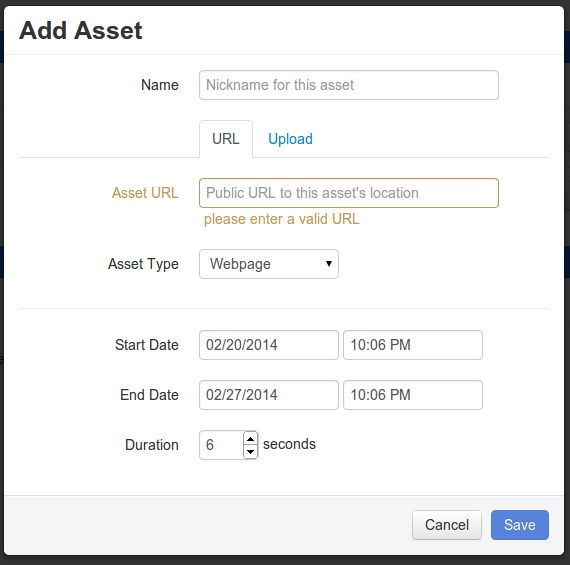
You can add new assets using the ‘Add Assets’ button in the top right of the screen. This will open another window which allows you to choose which type of asset (image, video or web page) and to set the start, stop and duration times. The FAQ page on the Screenly web site (see link above) contains details of the file types that are acceptable.

Screenly asset

There are two final management operations that are needed before the Screenly installation is fully configured: to expand the file system so that it uses all of the available space on the SD card, and then to change the keyboard to a UK layout (Screenly is American software and defaults to a US keyboard layout which will cause you problems). Firstly deactivate the Big Buck Bunny video in the management screen. Then, using the USB keyboard attached to the RPi, type Ctrl+Alt+F1. This will open the terminal window (white text on a black background). Next type the following command, followed by Enter:

sudo raspi-config

This will activate a new window which shows a list of options:-

raspi-config

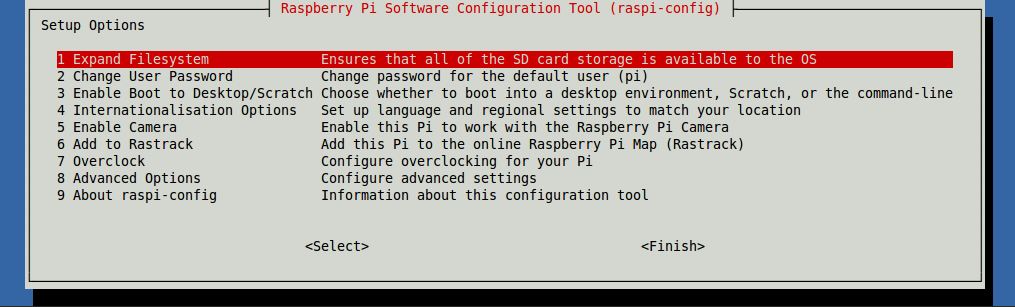
Select option 1 to expand the file system. Then, when that is complete, select option 4 (Internationalisation Options) which will open a sub menu which includes an option to change the Keyboard Layout. The Keyboard Layout sub menu has two screens; accept the default on the first screen, then select English-UK on the second screen. You may need to reboot the RPi for the change to take effect. You can now disconnect the USB keyboard; you will only need it again if you need to make changes to the Rpi configuration or wifi settings.

Summary

You now have a fully functioning, versatile digital sign or notice board that can be easily administered from any computer on the network. And all for very little financial outlay. Enjoy!

Posted in General | 7 Comments

DFS3 at the Festival of Thrift

On September 26th & 27th 2015 members of the Durham Free Software Skill-Share project demostrated their work at a stall at Darlington’s Festival of Thrift. The event which is now in its second year celebrates sustainable living, re-use and recycling.

the-festival-of-thriftSet in the re-purposed buildings of what was once the world’s largest wool factory, there was no end of variety of stalls, exhibits and talks. Our neighbours were the Fix-It Cafe, who had an impressive variety of tools and skilled volunteers mending all kinds of old and broken stuff.

Our stall featured four working laptop computers, aged between 5 and 11 years; a slide-show explaining the advantages of Free Software; a selection of leaflets and stickers (including some from our friends Open Rights Group and Transition Durham); some informative posters and a banner.

DSCF3418We spoke to lots of people who were curious about how they might be able to re-use an abandoned computer in their own home or improve the functioning of a sluggish windows machine. There were hands-on demonstrations of the systems on display as well as guided Linux installations with people who’d brought their own computers along. Here are a few statistics from the weekend:

Club Flyers issued: 210
Information Leaflets issued: 140 (of all types)
Successful Installs: 7
Unsuccessful Installs: 2

So, what about those two unsuccessful installs then? One of them was a very old machine with just 64MB of RAM available; we felt that although it was technically possible to get Linux running on it, the experience of using it would not be what this particular user was looking for, so it would have been wrong for us to waste his time and recommended instead that he look for a slightly better laptop with at least 512MB and a P4 or newer processor (such as can be obtained for nothing) then try again; the other was a laptop with a graphics chip that is not well supported in Linux, and although we would probably have been able to get it working with enough time, this would have required a working internet connection to do the necessary research.

IMG_20150927_122706

Unfortunately, poor internet (wi-fi) provision was a major setback to our weekend, although we had been assured in advance that it would be available. At one point we had a smartphone providing a portable hotspot, connected through a USB dongle to a machine that had supported wireless card of its own, in order to download the broadcom firmware and get that machine on-line when the owner got it home.

IMG_20150926_125219One outstanding success was with a machine that our new friend Peter brought along. It had an old windows installation on it that we were happy to cure for him, but the first problem was that the power socket was broken – not something we had come prepared for! Fortunately our neighbours the Fix-It Cafe had the right skills and tools to hand, so they were able to, well, fix it, before handing it over for us to install Linux Mint on.

Another masterpiece was Barry’s display board, which included a projection screen, fruit boxes, a cork board and professionally printed posters – all laid out using scribus, of course.

If you know anyone who’s planning an event you think we should attend, please let us know using these contact details.

Posted in General | 1 Comment

Learn to program the DIY way

Starting this week, some of Durham’s Free Software Skill-Sharers will be learning to program together. We’ve formed a small study group which will have face-to-face meet-ups for peer support, and we’ll be keeping in touch by email as well.

At the moment we’re open to more people joining in – if you’d like to give it a try, join in the conversation on our mailing list (read the archives to see what’s happening, then subscribe and post a message to the list). This is completely free of charge, but comes with no guarantees; we’re just some people doing it because we want to.

We’re going to be learning a language called Python, using a book called “Learn Python the Hard Way” which is available for free on the internet. The name is inaccurate – the author is just making a point that you need to practise in order to get good at anything. It is suitable for people who have never programmed before.

With the new national curriculum, kids have to learn to program in school from a very young age, so this is an opportunity to be able to help your grandchildren / children / buddies / self with your homework (depending on how old you are), or just to be able to say, “Aha, let Grandma show you how I’d do that in python”.

People give many different reasons for learning to program (also know as learning to code) including:

  • self-directed learning looks good on your CV
  • it could lead to higher study or employment in IT
  • it enables you to make your own programs which work just how you want
  • you learned how to program in BASIC on the BBC Micro and you want to know what’s changed since then
  • it teaches problem-solving
  • it provides a way in to an understanding of the world of information
  • it is a creative act that demands no other justification

We’re just starting now, so it won’t take you long to catch up… just start at the beginning of the book and let’s see where it leads us…

Posted in General | Leave a comment

First Skill-Share Event A Success

DFS3gThanks to Mick and Robbie at Unite Community Branch for writing up this summary of our first big event on the Community Support Centre Blog.

Here’s a photo of some of the participants outside the entrance. Had it not been for the heat, I think there would have been a few more of us.

So… what next?

We made some notes about what participants wanted to do next in this post on our mailing list. The main areas of interest were these:

  1. Do something with graphics, especially designing posters and fliers using free software (Dan and Nick are already working on this)
  2. Do something related to computer privacy for beginners… crypotoparty, anyone?
  3. Do install-fests outside of Durham city, in village halls and community centres; this is an ideal opportunity for people who aren’t technical wizards (yet) to volunteer, as it’s all about finding a venue in your hood and signing people up for a session. Book them and they will come.
  4. Do something with linux-based music-making and audio production (we have at least two linux musicians in the project)
  5. Find a way to get old computers into the hands of people who need them, in a useful state (i.e. linuxified) – Mark is going to have a chat to Freegle and see if we can work together somehow over that
  6. Something to do with getting google’s grasping claws and sticky fingers out of your smartphone

And so, dear reader, if any of these take your fancy, it would be a good idea to express an interest and find some other people who would like to make it happen with you. The obvious place to do this is using our mailing list, but be inventive. The important thing is to realise that it’s nobody’s job to make this stuff happen, so if we want it, we’re going to have to make it.

Posted in General | 1 Comment

Programme for July 26th – final


The day will be structured to have two pre-planned teaching sessions which form an introduction to Linux aimed at absolute beginners. There is also some time available to work in small groups on specific tasks, e.g. for people who are already using Linux but need a bit of help with something. The atmosphere will be informal so you can take extra breaks any time you want.

9.30

Volunteers arrive and set up space, power and networking

10.00

Participants arrive. Welcome, ground rules and introductions to the project

10.15

Overview of the day

  • What we will be doing today

  • What is “Mint”?

10.30

An introducing to using Mint

  • Demonstration

  • Q&A

11.00

Everyone gets a chance to say what they want to achieve by the end of the day.

Facilitator writes on a flip-chart and helps people form small groups to work on these together.

12.30

Picnic lunch (bring your own) in the grounds

13.30

How to get things done in Mint: a tour of common applications

  • Firefox for web browsing

  • LibreOffice for productivity

  • Gimp for image manipulation

  • How to play music

  • How to watch a DVD

  • The Software Centre (HOW many applications??!)

  • alternativeto.net

  • Q&A

14.30

Feedback and Planning session

As a group, we’ll have a facilitated discussion to cover:

  • What worked well about today?

  • What could have been done differently?

  • What do we want to do next?

    • More meetings where, how often?

    • Different formats for sessions?

    • Different topics to cover?

  • Sharing out the work to make it all happen

If anyone hasn’t achieved what they wanted to during the day, we can point them to on-line resources or arrange to carry on together at another time.

15.00

Finish, possibly go to a pub


Posted in General | Leave a comment

Computers for Durham Community Support Centre

Here is an example of a project that we’ve completed, taking two old computers out of retirement and putting them to a good use.

We’re affiliated to the Durham Community Support Centre, a joint venture between Durham Miners’ Association and Unite the Union. Unite had two computers that they were not using as they were considered too old and slow. We had a chat and decided to set them up for visitors to use, to enable them to apply for relevant jobs or benefits, access educational materials and organise campaigns.

IMG_20140619_142426

The computers were IBM ThinkCentre machines with 2.93GHz Celeron processors, 40GB hard drives and 512MB RAM (some of which is shared with the graphics processor, so the memory available to the operating system is actually less than this). These resources aren’t nearly enough to run a modern version of Windows, but are enough for a general-purpose desktop GNU/Linux system.

Choosing an operating system

There are plenty of different varieties of GNU/Linux and other free operating systems to choose from, so here are the things we considered when narrowing down the options:

  1. Must work well on the hardware available – this means that fancy desktop environments like KDE 4 and Gnome 3 would be less suitable than lightweight environments like LXDE or XFCE
  2. Must be suitable for people who have only used Windows before, and for people who are just interested in using the computer as a tool to get a task done (rather than learning how it works – although we hope people will be tempted by that too)
  3. Must be easy to set up and maintain, because we’re doing this in our spare time.
  4. Must be supported (i.e. receiving security patches) now and at least two years into the future.
  5. Must provide access to quality-controlled repositories of free software, to make it easy to install the programs that most people will need for general office use.

We opted for the current long-term-support edition of Linux Mint with XFCE desktop as a good match for these criteria.

Preparation

Usually when you turn on this kind of computer, it runs the programs stored on the hard drive inside. When you’re installing a new system, you don’t want this to happen, you want it to start an operating system installation program that you’ve supplied. With modern machines, it’s easiest to bring this on a USB stick, however these machines were built at a time when it was common for computers to be able to boot up from CD-ROM and DVD drives, but not from USB sticks. So it was important to prepare the correct installation medium before we could start. These machines had DVD drives, and the version of Mint we used fitted easily onto a DVD, so we used another computer to download and burn the image to a disk.

If you do this using a version that’s just been released, you’ll only need the installation disk, and any future updates can be downloaded one by one over the internet. However because Mint 13 is already nearly two years old, we could anticipate that there would be a lot of updates needed straight away. We could have let the operating system update itself over the network in the support centre, but we weren’t yet sure how we would connect to the internet, and also we wouldn’t want to do a large amount of downloading when other people in the office were trying to get work done over the same network, as it would slow it down a lot. Not how to make friends and influence people ;-)

A handy trick – AptOnCD

In this situation, it’s good to download the updates using another network (or at another time), and there’s a useful tool for saving the updates to another CD or USB stick included with Mint – called AptOnCD. “Apt” stands for Advanced Packaging Tool, and is the name of the program that Mint (and related systems) use to handle software installation and updates; “on CD” is because the software gets written to a CD rather than being pulled over a network connection, which is the more common way to use apt. The procedure breaks down like this:

  • Install Mint on a test machine (we used a virtual machine, but that isn’t important)
  • Run the update manager (under the ‘system’ menu) on the test machine and install all updates
  • Run AptOnCD (also under the ‘system’ menu) and click the ‘create’ button
  • After it catalogues your software, click the ‘Burn’ button
  • Choose to write an image file (.iso) and save this on a suitably-sized USB stick.

Performing the installation

First off, we double-checked with the previous user of the machines that there was nothing important stored on the hard drives, and that it was OK for them to be wiped. Then we inserted the DVD containing Mint 13 into the DVD drive, rebooted the machine and pressed F12 as it started up. This brought up a menu to choose which device to boot from – in our case, we chose the DVD drive.

The actual installation software started up automatically, and by following the on-screen prompts and accepting all of the default options, it was self-explanatory. The difference between this and installing Windows is that you don’t need any hardware drivers (the Linux kernel detects most common hardware without any help), and there’s no product activation key or horrendous legalese license agreements. When it’s finished, it tells you to take out the DVD and reboot.

The first time it ran from the hard-drive, we used AptOnCD to restore the updates we’d saved on a USB stick from our test machine.

Getting connected

There was already a computer in the room that accessed the internet over a wifi connection. We didn’t have wifi cards or dongles for our machines, so we looked at the alternatives; how could we connect these machines without buying any more equipment?

The router we wanted to connect to was in the room next door, and fortunately there was already a hole in a convenient place in the wall where we could pass a cable through. We didn’t have the right length of cable, but we guessed that lots of people would have some lying around unused so we asked on Freegle and were kindly offered what we wanted by someone who’d upgraded his home network to wireless. A short bike ride later, we had the wire and were all linked up.

But hang on, there are two machines to connect and only one cable… what to do?

Another piece of equipment that you can find a lot of these days is old ADSL modem/routers. It seems that most ISPs give you a new one when you sign up these days. We had one which had previously been used to connect to O2 broadband, and had been configured by them in such a way that it wouldn’t connect to any other ISP’s ADSL system. So the ADSL modem part of it was useless, but the same device also contains a 4-port network switch and wireless access point. We turned off the wifi to save energy, and hey presto, a 4-port ethernet switch. All we had to do then was plug one port into the ‘upstream’ cable (the long one to the router next door) and one port to each of the two computers using standard Cat5 patch leads.

Another option would have been to connect one computer to another directly, so the network connection was shared (using either a spare network card or other unused ports) but this requires that one computer is always turned on before the other will work. People can find that confusing. The option we used just needs someone to turn on the mains extension that powers the computers, then turn either on independently.

Summary

We took two old computers, three unused network cables and an old ADSL modem which would otherwise have been hazardous waste, and turned these into a resource for people to help themselves to the internet and general-purpose computing. We did this with no money, in our spare time, and now that we’ve done this we’re confident we could do it again on any similar old computers.

Do you have some old computers or network equipment that you’d like to bring back into use? The chances are that someone in our group will be able to advise you on how to approach the task, or point you in the right direction to get you started. Get in touch or book a place to come to one of our events.

Posted in General | 6 Comments

Free software for everyone: a DIY computer project in Durham

Have you ever wondered why you have to buy a new computer every few years, even if the new one doesn’t do much more than the old one? Perhaps you’ve put an old computer in a cupboard because it doesn’t seem to work right any more, and you’ve never found the cash to get it fixed?

What if someone showed you how to fix it yourself, and gave you the skills to make it work how you wanted?

That’s just what this project sets out to do. The Durham Free Software Skill-Share (dfs3 for short) aims to give everyone access to a working computer in their own home.

The way we’ll be doing this is by taking computers that are a few years old – either the one in your cupboard or an unwanted machine from elsewhere – and setting them up using Free Software. You’d be surprised how well an old computer can work if you take away the programs you don’t need and use an efficient operating system like GNU/Linux (that’s a replacement for Microsoft’s Windows or Apple’s OSX).

Another surprise is that learning how to do this isn’t all that difficult, and can be a lot of fun if you go about it the right way. And once you’ve learned the basics, you can help support other people to get up to your level, while you take on whatever other IT challenge is relevant to you. It’s self-directed learning, supported by volunteers from North East Linux User Group and Durham Community Support Centre.

Re-using old machines has lots of social and environmental benefits, which you can read more about here. That’s why we’re involving Transition Durham, who have a lot of expertise in building community resilience as well as promoting responsible use of resources.

Our launch event is at the Miners’ Hall on July 26th 2014 and is open to all – but please let us know to expect you by using this form. If you have any questions about it, get in touch by emailing dfs3@riseup.net or by phoning 0191 303 8968. We’d be happy to discuss any special requirements you might have.

And by the way, some of the people who most need our help with this won’t get to hear about it from the internet if they haven’t got access to a computer. We’re relying on word-of-mouth communication to reach people, so have a think about it; do you know someone who doesn’t get to hear about good things because they’re not on line? Please give them our phone number.

If you could print out a copy of this poster, then let us know where you’ve displayed it, that would be a great help too.

Computer Poster003

Posted in General | Leave a comment

Things you don’t have to pay for, and why

Pu_money

Money

The internet has a lot of services that claim to be “free” in the sense that you don’t have to pay up-front to use them. These are mostly funded by advertising revenues from the websites and by selling information about how we, the users, behave on the internet.

Some people are trying to run services that are different to this. One example is the blog you’re reading now, which is funded by donations and run by volunteers. Wikipedia is another. For anyone who’s idea of “free” extends beyond not having to pay up-front; to include things like not being under permanent surveillance and not having your attention to adverts traded as a commodity; this seems much better.

However, making a switch from corporate services to ones that are free in a more profound sense can prompt us to reconsider the way we use the internet. It might require us to behave differently in ways that aren’t always obvious.

Let’s look at mailing lists as an example. If you’re used to using google or yahoo groups, you’ll expect to be able to send large files as attachments. These will either be forwarded to everyone on the list; or stored on a server, the contents analysed for what kind of advertising to show alongside it, and a link to it’s web address put in your email, which when you click on it monitors that you’re interested in that kind of stuff. In either case, the money to run the service comes from corporate marketing budgets.

When you use a service that’s funded by donations, the situation is different because there isn’t a huge budget to pay for all the server load and network traffic created by the above approaches. And even if there was, it’d still be better to reduce the amount of work the machines have to do, as it all uses energy, and besides, isn’t it a good thing to be aware that you’re sharing a resource with other people, so you’ll only take what you need?

The way this plays out with the Mailman free software which powers dfs3@lists.aktivix.org is that message sizes are limited to 40KB by default, which means no big file attachments. We could increase the limit but that could have other effects I’ll return to later. So what should you do if you want to show everyone on the list the file you’ve created?

Sharing

Sharing

First things first: in line with our focus on Free Software, you should always try to share files in open formats. Not only does this increase the likelihood that people will be able to read it properly, open formats are also likely to mean smaller files with the same amount of useful information.

Next, could you compress your file? Zip files are a common way of doing this. The technique relies on some clever maths that you don’t need to fully understand in order to use it, like most software. It works better with some files e.g. written English text than others e.g. video and audio, because the latter are already compressed and there’s only so far you can go.

Then, think of a place on the internet where you can upload your file. This could be a blog like this one, a wiki, an etherpad, a personal web page (some ISPs give you one as part of your bundle), a dedicated site for network organising, or an owncloud instance if you know someone who runs one. Upload the file you want to share, and make a note of its URL.

Now when you write your email to the list, you can paste in that URL instead of attaching the file. When people get your email, only the people who really want to see it will click on the link, which saves on network bandwidth, and downloaders will all click at slightly different times, meaning there isn’t a big peak in server demand at a single time.

To return to the question of “why not just increase the limit for file size on the mailing list?” you can see that by taking another approach – of having a link to the resource rather than sending the whole thing to everyone – we end up with less load on the networks. The part of the networks you explicitly pay for is usually the connection to your ADSL, cable or mobile broadband provider, and it’s worth considering that other users might have different connection arrangements from you.

If you live in a van or a boat, you probably rely on mobile phone technology which is much slower than most copper wires (& optical fibres), so you’ll be cursing people who send you stuff you didn’t really need to see as it slows down getting to the rest of your email. Similarly if you’re very remote you might have a satellite network connection. Some people have fast (i.e. broad-band) connections and have usage limits which seem pretty big for one person, but what if someone’s sharing with lots of other people in the same house? Or if a neighbour said you could use her wifi as long as you don’t use too much? In the end, it’s all about considering other people’s needs in light of our different situations.

Have you found any other ways of distributing your files? Share your ideas
using the ‘comments’ function below.

Posted in General | 2 Comments

Draft programme for skill-share day on July 26th 2014

UPDATE: This is a draft. The finalised programme is different. Read it here.


Some people like to start the day with a blank flip-chart and take it from there. Others prefer everything to be set out beforehand. In an attempt to find a happy medium, here’s an attempt at a way of structuring our day; this is open for comments so please say if you can think of any improvements.

We have been offered the use of a large room at the Durham Miners’ Hall, and have planned to hold our first skillshare session there on Saturday, July 26th 2014 from 10am to 3pm. Hopefully this will be the first of many – whoever turns up and joins in will get a say in what happens next.

Draft Programme for July 26th

9.30

Facilitator and volunteers arrive and set up space, power and networking

10.00

Participants arrive. Welcome and introductions.

10.15

On a whiteboard or flip-chart, write a list of what every participant wants to achieve today. Examples might include “get linux installed on this laptop”, “find a free alternative to program x”, “get program y to perform function z”, “learn how to encrypt my emails”, “get my free software to work with this printer”, etc.

10.30

Volunteers and all participants look at the list and pick tasks that they are able to help with.Facilitator aims to ensure that all tasks are covered, and that everyone gets a chance to contribute something if they want to.

10.45

Morning work time. People form small groups of 2 or 3, to work on each task separately.

12.30

Picnic lunch (bring your own) in the grounds

13.00

Afternoon work time, opportunity to work with different people / on other tasks, still in small groups.

14.00

Feedback session: someone from each small group says what they did. If they have unresolved problems, other people might suggest solutions. People who’ve learned new skills might say whether they could show someone else how to do it next time.

14.30

What next – discuss what we want to do next month, planning, room booking, share out tasks to make it happen.

Suggestions so far include:

1. “Install-fest” – a session aimed at getting new users up and running by helping to install and configure free software on their computer.

2. “Free Software Clinics” – anyone who has a problem with their free software (especially beginners) can come and get help and guidance from people who are either experts, or just know how to solve a particular problem because they’ve done it before.

3. Themed skillshares: participants choose a topic they want to know more about, study it and present their findings to the group as a talk or demonstration, also make use of any expertise within the group.

15.00

Finish


Posted in General | Leave a comment